Sciatica is widely recognized as one of the most persistent and debilitating forms of nerve pain, affecting millions of individuals globally. It originates in the lower back and radiates down the leg, often causing numbness, tingling, or sharp, electric-shock sensations. While conventional medicine often prescribes pharmaceuticals or physical therapy, holistic modalities like reflexology have gained significant traction for their ability to address the root cause of nerve compression through the body’s meridian pathways.
By understanding the intricate map of the feet, practitioners can target specific zones that correspond to the lumbar spine and the sciatic nerve. This guide provides a comprehensive, authoritative look at professional reflexology protocols designed to alleviate sciatic distress, reduce inflammation, and restore mobility.
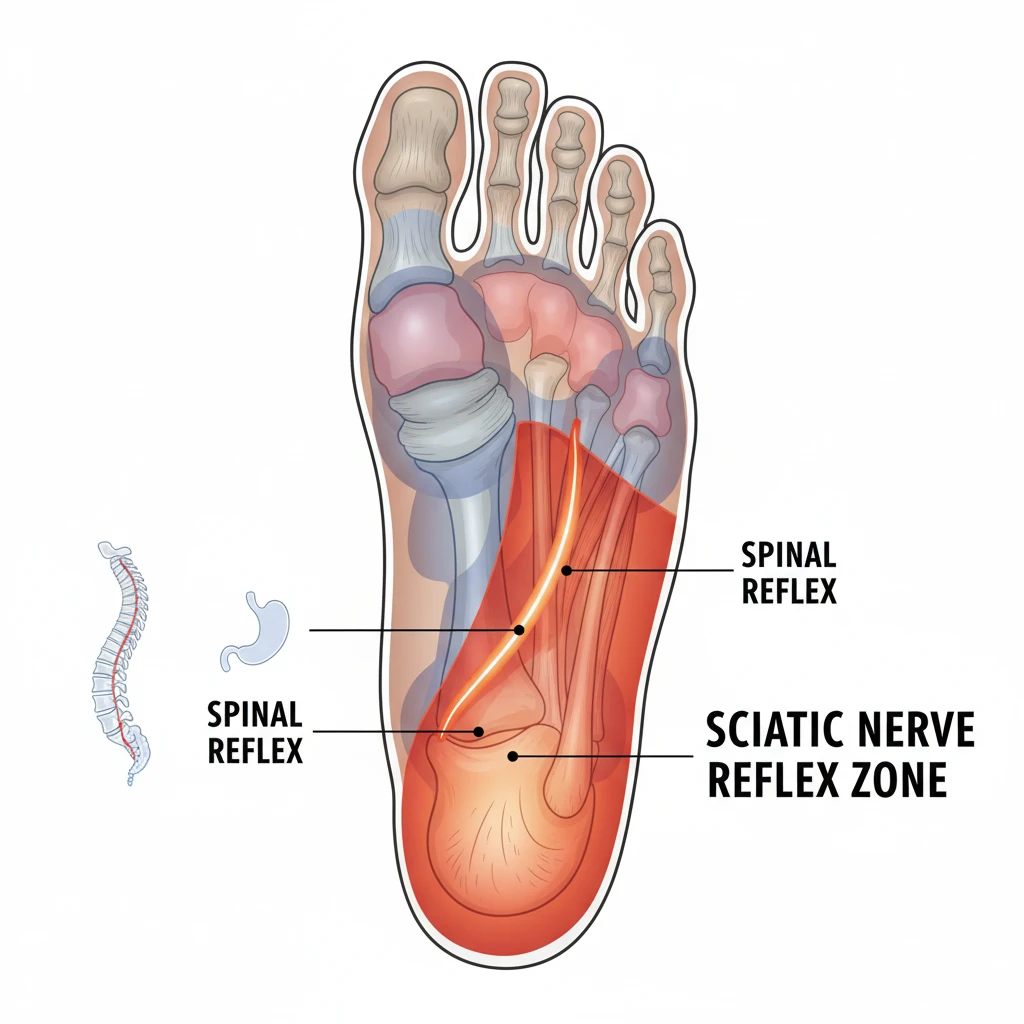
Reflexology for sciatica is a therapeutic practice that targets the sciatic nerve reflex zone, located horizontally across the heel and around the ankle bones. By applying consistent, caterpillar-like thumb pressure to these specific areas, practitioners stimulate blood flow, interrupt pain signals to the brain, and encourage the release of endorphins to alleviate the compression and inflammation associated with sciatic nerve pain.
Understanding the Sciatic Reflex Connection
To effectively utilize reflexology for sciatica, one must first understand the physiological and energetic connection between the foot and the sciatic nerve. In the discipline of reflexology, the body is divided into ten vertical zones, five on each side, extending from the head to the toes. The sciatic nerve, being the longest and widest nerve in the human body, has a very distinct representation on the foot.
The sciatic nerve runs from the lower back, through the hips and buttocks, and down each leg. Consequently, the reflexology map mirrors this path. The lumbar spine (where sciatica often originates due to herniated discs) is mapped along the medial arch of the foot. The nerve pathway itself is represented across the heel and the ankle. When a client is suffering from sciatica, these reflex points often exhibit “crystals”—crunchy deposits of calcium and uric acid—indicating congestion in the corresponding energy zone.
According to research highlighted by the National Institutes of Health (NIH), reflexology has shown potential in significantly reducing pain intensity and anxiety in patients with chronic pain conditions. This suggests that the manipulation of foot reflexes does more than just relax the foot; it triggers a systemic nervous system response that can down-regulate pain reception.
Identifying the Sciatic Nerve Reflex Point on the Heel
Precision is paramount when treating nerve pain. Missing the reflex point by even a centimeter can result in a general foot massage rather than a therapeutic intervention. The primary sciatic reflex is not a single dot, but rather a band or zone.
There are two critical areas to identify:
1. The Plantar Heel Zone
The most direct reflex point for the sciatic nerve runs horizontally across the width of the heel, approximately one-third of the way down from the ankle to the sole’s edge. This area often feels tight or “ropey” in individuals with active sciatica. Practitioners visualize a band running from the inner heel to the outer heel.
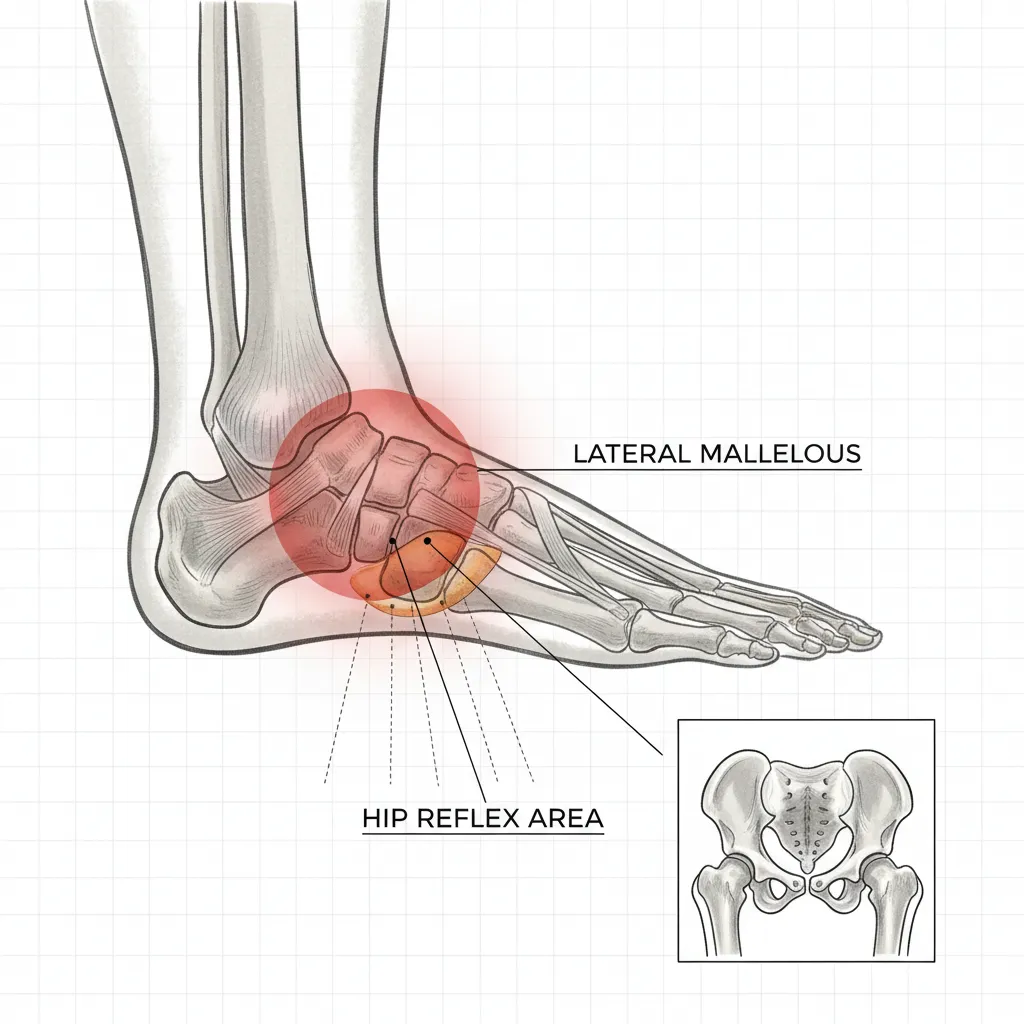
2. The Retro-Malleolar Grooves
This is a secondary, yet crucial, access point. It is located on the sides of the ankle, in the soft depression between the ankle bone (malleolus) and the Achilles tendon.
- Inner Ankle (Medial): Relates to the spine and pelvic organs.
- Outer Ankle (Lateral): Relates to the hip and gluteal muscles.
Working these grooves is essential because sciatica is often caused by piriformis syndrome, where the muscle in the buttock compresses the nerve. Stimulating the outer ankle reflex helps relax the hip and gluteal muscles, indirectly relieving pressure on the nerve.
Core Techniques to Reduce Nerve Inflammation
Merely pressing on the heel is insufficient for acute cases. Specific thumb and finger techniques must be employed to break down deposits and stimulate the parasympathetic nervous system.
Thumb-Walking (The Caterpillar Walk)
This is the cornerstone technique of clinical reflexology. The practitioner bends and straightens the first joint of the thumb, inching forward like a caterpillar. This creates a rhythmic, biting pressure that penetrates deeper than a static press. When applied to the heel, thumb-walking should be done in multiple horizontal passes, covering the entire width of the sciatic zone.
Hook and Backup
For pinpoint precision on stubborn crystals, the “hook and backup” technique is used. The practitioner locates a tender spot within the sciatic zone, presses in with the thumb, hooks it slightly to the side, and then pulls back. This action is designed to physically disrupt the crystalline deposits interfering with nerve impulses.
Adrenal Gland Stimulation
Inflammation is a primary driver of sciatic pain. In reflexology, the adrenal gland reflex is the body’s natural “cortisol switch.” Located slightly above the center of the foot, just below the ball of the foot in line with the big toe, stimulating this point encourages the body to produce natural anti-inflammatory hormones. This should always be included in a sciatica protocol.
Step-by-Step Reflexology Protocol for Sciatica
To achieve maximum relief, a structured approach is necessary. Randomly rubbing the foot will not yield clinical results. Follow this authoritative protocol:
Phase 1: Warm-up and Relaxation (5 Minutes)
Begin with general foot relaxation techniques. Ankle rotations, metatarsal kneading, and solar plexus breathing (pressing the center of the foot while the client inhales) are vital. A relaxed foot accepts deep work better than a tense one.
Phase 2: The Spinal Flush (5 Minutes)
Before treating the leg, treat the back. Thumb-walk up and down the medial arch of the foot (the spinal reflex). Pay special attention to the heel-arch junction, which corresponds to the lumbar and sacral vertebrae (L4-L5-S1), the most common sites of sciatic compression.
Phase 3: The Sciatic Heel Work (10 Minutes)
This is the core treatment phase:
- Support the foot with one hand holding the toes.
- With the working hand, thumb-walk horizontally across the heel from medial to lateral.
- Repeat this “cross-fiber” friction 5 to 7 times.
- Switch to the ankle area. Use the index finger to circle and press into the grooves behind both ankle bones. This often elicits a sensation of “good pain” in clients.
Phase 4: The Hip and Knee Reflexes (5 Minutes)
Often, sciatica refers pain to the knee or is caused by tight hips. Work the reflex area located below the outer ankle bone in a crescent shape. Loosening this area corresponds to relaxing the hip joint and the gluteal muscles.
Frequency of Sessions for Acute vs. Chronic Sciatica
The frequency of treatment is just as important as the technique itself. The body needs time to integrate the work, but the nervous system requires repetition to change its pain signaling.
Acute Sciatica (Flare-ups)
When a client is in active, high-level pain (acute phase), sessions should be shorter but more frequent. The goal is pain management without overstimulating a sensitive nervous system.
- Frequency: 2 to 3 times per week.
- Duration: 30 to 40 minutes per session.
- Focus: Gentle sedation of the nerve points and adrenal support.
Chronic Sciatica (Maintenance)
For long-standing issues or post-flare-up maintenance, the goal shifts to structural alignment and prevention.
- Frequency: Once a week for 4 weeks, tapering to bi-weekly.
- Duration: 60 minutes (full body/foot protocol).
- Focus: Deep work on the spinal reflexes and breaking down heel crystals.
Complementary Stretches and Home Care
Reflexology is most effective when paired with physical movement that opens the physical pathways for the nerve. Clients should be encouraged to perform specific stretches immediately following a session, provided they are not in excruciating pain.
The Piriformis Stretch is the gold standard for sciatica. Lying on the back, the client crosses the affected leg over the opposite knee (figure-four shape) and gently pulls the uncrossed leg toward the chest. This stretches the deep buttock muscles that often entrap the sciatic nerve.
Additionally, using a tennis ball or lacrosse ball to roll out the glutes can mimic the “hook and backup” reflexology technique but on the muscular level. For authoritative advice on sciatica exercises, resources like the Mayo Clinic provide excellent, medically reviewed regimens.
Safety Considerations and Contraindications
While reflexology is generally safe, there are specific scenarios where it should be avoided or modified regarding sciatica protocols:
- Foot Fractures or Recent Injuries: Do not work on a foot that has recent structural damage.
- Deep Vein Thrombosis (DVT): If there is any suspicion of a blood clot in the leg (indicated by heat, redness, and swelling in the calf), reflexology is strictly contraindicated as it stimulates circulation and could dislodge the clot.
- Pregnancy: While reflexology is great for pregnancy-related sciatica, the ankle points are also associated with the uterus and ovaries. Aggressive stimulation here can trigger contractions. Practitioners must be certified in prenatal reflexology before attempting this.

By adhering to these protocols, identifying the correct heel zones, and maintaining a consistent treatment schedule, reflexology offers a powerful, drug-free avenue for managing and eventually overcoming the pain of sciatica.
People Also Ask
Does reflexology really work for sciatica?
Yes, many people find relief through reflexology. By stimulating specific points on the feet that correspond to the sciatic nerve and lumbar spine, reflexology can help reduce inflammation, improve blood flow, and interrupt pain signals, providing significant relief for sciatica sufferers.
Where do you rub your foot for sciatica pain?
To address sciatica pain, focus on the heel of the foot. The primary sciatic reflex zone runs horizontally across the width of the heel. Additionally, massaging the grooves behind the inner and outer ankle bones can help release tension in the hips and lower back.
How often should I do reflexology for sciatica?
For acute pain, 2 to 3 sessions per week are recommended to manage inflammation. For chronic maintenance, a weekly session is standard. Consistency is key to preventing the re-accumulation of tension and crystals in the reflex zones.
Can reflexology make sciatica worse?
In rare cases, a phenomenon called a “healing crisis” can occur, where symptoms temporarily intensify as the body releases toxins and realigns. However, if performed correctly by a certified professional, reflexology should not cause injury or long-term worsening of sciatica.
What is the best foot massage technique for sciatica?
The “thumb-walking” technique is the most effective. This involves inching the thumb across the heel in a caterpillar-like motion to apply deep, specific pressure to the nerve reflex, rather than just rubbing the skin surface.
How long does it take for reflexology to work on sciatica?
Some clients experience immediate relief after a single session, particularly a reduction in pain intensity. However, lasting results typically require a course of 4 to 6 treatments combined with proper stretching and home care.